Every moment spent in the peaceful beauty of your garden is a moment you are investing in yourself and your well-being. So, let's make your dream garden a reality with a little help from an expert.
On top of the in-depth interview with landscape architect, illustrator, and educator Lisa Nunamaker that you'll find below, we invite you to use our free Ultimate Spring Planning Guide, which includes 10 more of Lisa's beautifully illustrated landscape plans, full plant lists, and design tips to inspire your own outdoor oasis.
Before you embark on your first DIY design project — big or small — the first step is always to simply be in your space.
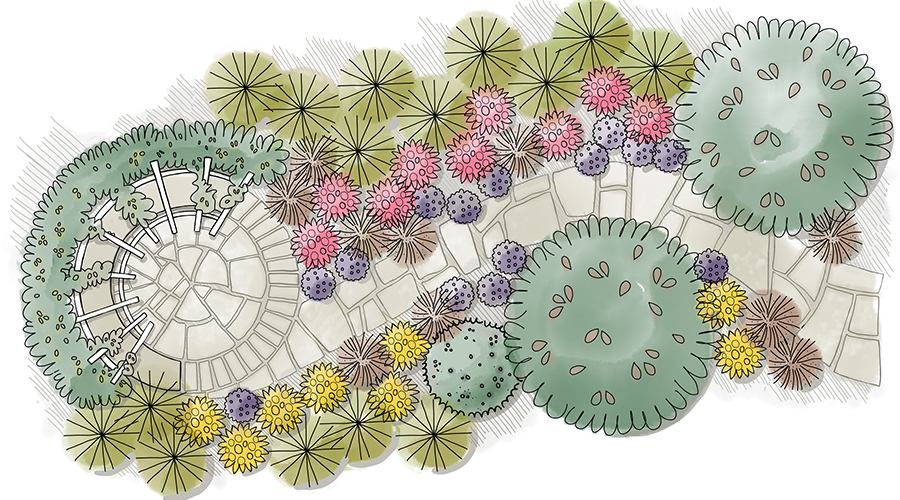
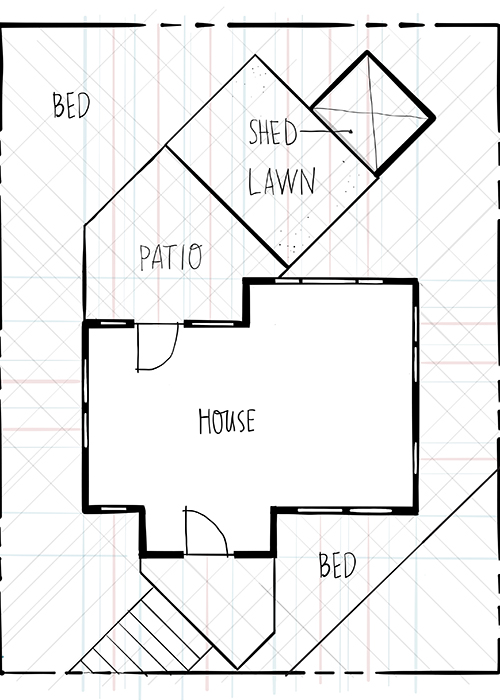
(Above) Lisa Nunamaker's Bees and Butterflies landscape plan is featured in our free Backyard Habitat Guide with a full plant list and pollinator-friendly gardening tips.
Sign up for our Grow Beautifully newsletter to receive more of Lisa's landscape plans delivered straight to your inbox.
The more time you spend outdoors, the more you understand the conditions you're working with and how you want to spend time in your space. Deciding on and starting with your top-priority project allows you to spend more time outside, which will lead to a better understanding of what you want to do next.
Now, once you've done that you're ready to dive in! Join us in our conversation about how home gardeners and plant lovers can become DIY designers and create their own personal retreats. With a little observation, thought, and a pencil and paper, you'll be ready to start designing your own dream garden.
How to Start the Design Process
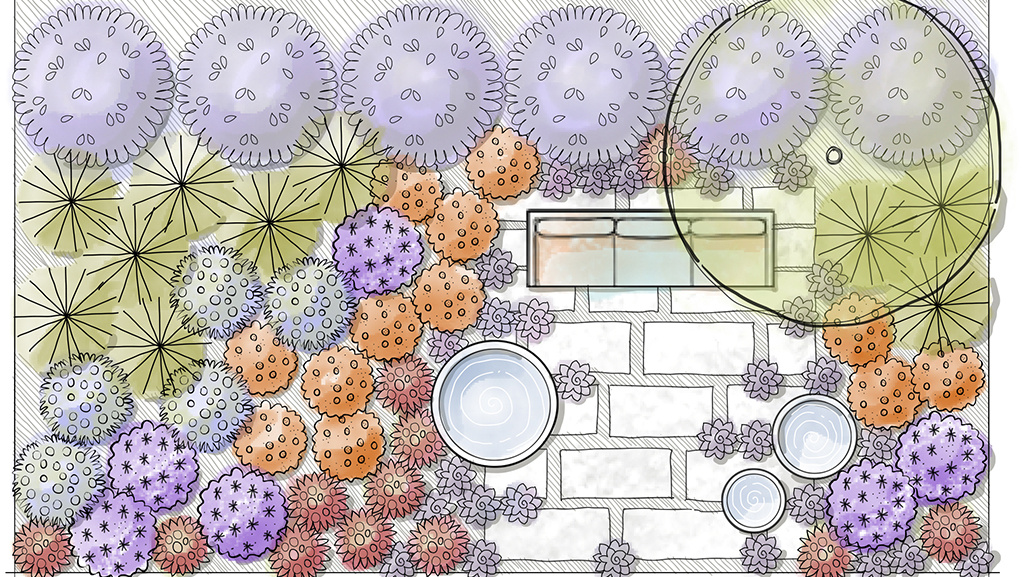
(above) This "Dark Meets Light" landscape plan is featured in our free Landscape Style Guide with a full plant list and design tips.
What big lessons or ideas are important for new or DIY designers to learn about the garden design process?
I always tell my students to get away from their desks when they can. You can look at images and plants on the Monrovia website, but going for walks or to the farmers market, thrift stores, or even gift stores and seeing all of those colors and textures in person spurs a lot of creativity and new ideas in my brain.
I also really encourage them to start sketching their ideas, and to sketch a lot of ideas. You won't come up with the final design right away, so don't be afraid to go through a lot of tracing paper and sketches at the beginning of your process. You can print out a Google Earth map or an early landscape plan and just sketch over it with tracing paper. Or, you can start in your sketchbook without a map to get started. That way, you can explore different shapes and forms and different ways that things connect in the space. Keep sketching and trying new ideas, and if you come to a sticking point, stop and do something else or move on to the next idea.
What are some key elements to consider when designing a garden layout?
The first thing to do is to figure out what you're designing. You need to understand what you are trying to achieve. For instance, are you trying to create an outdoor dining room with a table that seats six people? Start there.
For our yard, we knew we wanted an outdoor dining area, and we knew we wanted a place to gather with friends around a fire pit. So you start with the functions, and then you work with the site and the site conditions in terms of the best places to carry those functional spaces out.
Always start by asking what you want from your space. It could be just a planting border, it could be a place where you can sit back and relax in the garden, or it could be a functional outdoor room.
You can boil the landscape design process down to 3 main steps:
- Function: Decide on that function first, and how many of those functional rooms you want to have.
- Placement: Decide where you can place the room(s) to serve the function that it needs and work within the boundaries of the space
- Aesthetics: Decide on the material and plant choices.
The Most Important Elements for Your Garden Design
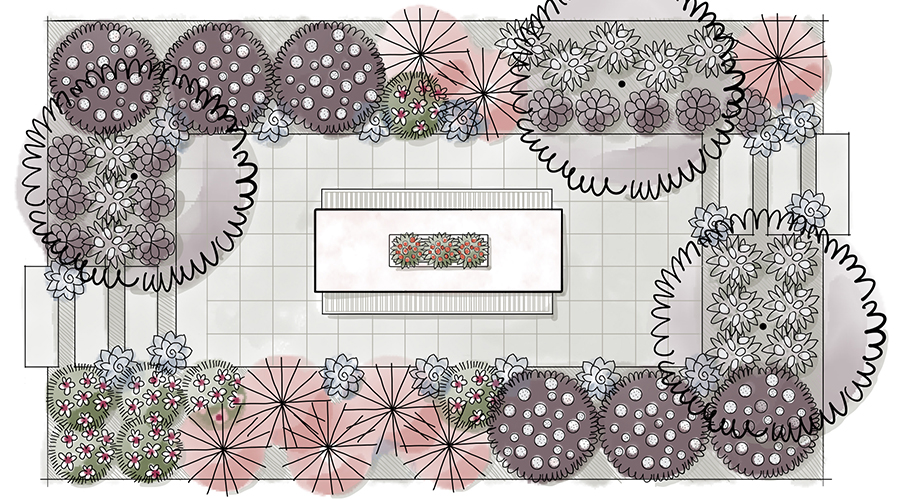
(above) This "Garden of Abundance" landscape plan is featured in the free Landscape Style Guide with a full plant list and design tips.
How do you approach incorporating elements like hardscaping, water features, and seating areas into your design?
I always start with the shape of the floor, or room, first. If you start from the idea that the basic unit of landscape design is the garden room, you can start with building that room from the ground up. What size and shape do you want the floor of that room to be in order to accommodate its function? Start there with every single room. Think about the shape of the floor, then think about the material and choose a material that complements the house and the rest of the space.
A lot of people get stuck here and want to go straight to the plants. But you really need to decide on the shape and size of the room first, and then move on to the materials and plants that you will use to create the room you want. The plants are there to reinforce the space as the walls and the ceiling.
From there you can move on to connecting the outdoor rooms with plants, adding pathways, and thinking about the way the pathways flow, and how wide they need to be based on the amount of traffic.
If you have a garden room that you want to be more private or secluded, how do you accommodate that within the design?
The three main things to consider for creating privacy are:
- Space: The space you have
- POV: The height of the line of sight that you are trying to block in order to achieve a sense of seclusion or privacy
- Time: How soon do you want privacy? Use hardscape and/or larger plants to achieve immediate results.
If you're trying to gain privacy from a neighbor's two-story house that has windows on the second story looking down, that will be a different case than a feeling of privacy from a street or neighbor on ground level.
If you don't have a lot of space and you want privacy quickly, hardscape is often the best option. A pergola, trellis, or fence are all great examples of this. You can grow vines, perennials, and shrubs around these over time. If you can create a privacy hedge or tall "green walls" with large, dense plants like arborvitae or juniper trees, that works well, too.
How to Lay Out a Low-Maintenance Landscape with a Natural Flow
How do you create a sense of cohesive flow in your landscape plans?
Use focal points and views from the house to align rooms and spaces and connect them together. The focal point could be anything from a fire pit to a unique plant specimen.
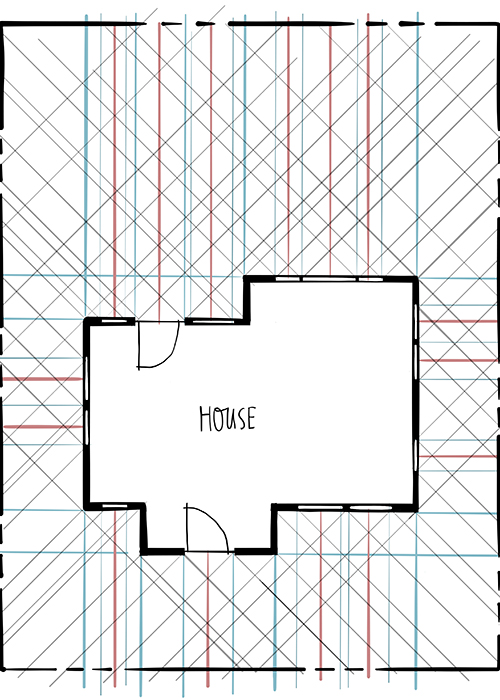
I use a system called "Lines of Force" (see illustration above), which is basically a grid that uses the lines of the house to help you create that easy flow in your landscape design. The grid helps you decide where your focal points should be and how to align your outdoor spaces.
All good landscape designs follow this concept, and once you understand how it works, it's easy to see it play out in your favorite gardens.
What are some design tricks for creating a lush yet low-maintenance garden?
Plant more plants! Fill your flower beds as thickly as you can. It may be counterintuitive to some, but more plants usually mean less maintenance for gardeners. That's because the more plants you have, the fewer opportunities weeds have to creep in. This links to the idea of green, or living, mulch. Install your plants in layers, and make sure you always have plants covering that ground layer.
Mulch works well for keeping weeds at bay in the short term, but the ultimate goal is that plants are covering all of your exposed soil eventually. Use a layering system with lots of low-growing plants to fill in under your taller plants, and cover the entire ground. These may be grasses, perennials, or groundcovers of other kinds.
How to Decide on Plants for Your Design
Choosing plants is our favorite part of garden design, but it can be hard to narrow it down. How do you decide on which plants to use in your designs?
I use a funneling system. I need to give myself as many boundaries as possible to limit my choices.
The factors I use to narrow it down are:
- The site itself: Growing zone, moisture level, sun, soil, exposure, etc.
- Height and size: Where are the plants going to live and what is the function they are fulfilling? Are they providing privacy? Structure? Groundcover?
- Color: I encourage my students to have no more than 3 colors in their palette. Each outdoor room can have a different palette, but try to narrow it down to a few colors. It really unifies the design when you can do that.
- Form and texture: Make sure you have some interest all year long. Strong form and texture will hold the entire design together even when there is no color. I want to make sure I have woody shrubs and evergreens in my plantings to provide balance. I like to have a balance of small leaves with large leaves.
Which plants do you choose first?
I usually decide on the larger, more structural plants first. Then I use them to anchor my design and build the layers out from there. If I'm designing a perennial bed, I'll look at shape, texture, and size first and build from there.
You are based in Des Moines, IA, so are in the perfect place to recommend plants to midwestern gardeners. What are your favorite go-to plants?
I'm always choosing plants with a "plant community" idea in mind. So I think a lot about that lower plant level, or "green mulch" we were talking about. So I've been experimenting a lot with groundcovers. A simple lower layer can unify an entire design.
I've been using a lot of sedge, or Carex. I love to use that as a groundcover, and you can mix in courser textured plants, like tiarella, to add to the texture. I have a lot of shade in my garden, so I'm always experimenting with texture.
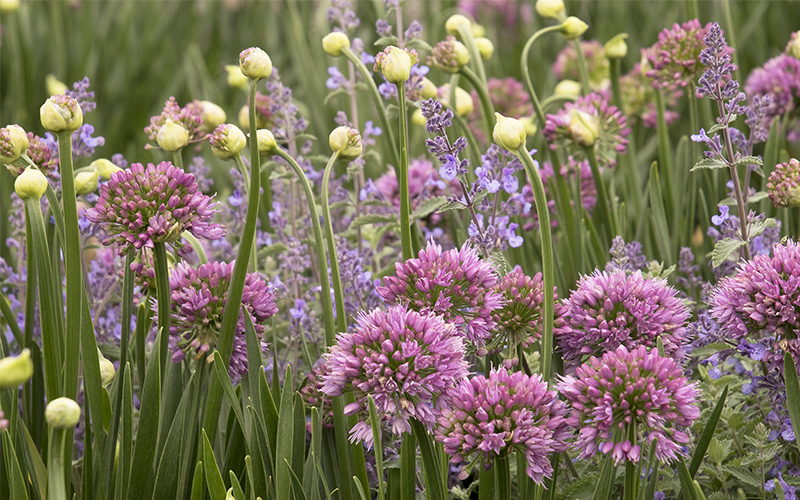
I love allium. I have ten or more different cultivars in my yard that bloom at different times, so there's allium blooming in my yard from late spring through September. Plus, they are really low-maintenance and require no irrigation. When we had a really bad drought, the alliums were one of the few plants that weren't harmed. The grassy foliage looks good no matter what, and the blooms are beautiful. You can do something similar with other plants that have a lot of different cultivars, like veronica or salvia.
I've also been really interested in grasses. I love prairie dropseed, which is native here and grows fine in hard clay soil. That makes it a great option for tough urban sites, like a right-of-way.
Lisa's Favorite Perennials for Sun
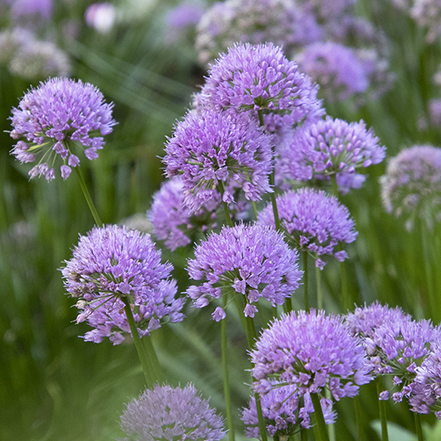
Millenium
Ornamental Onion
A profusion of large 2-inch round, bright, rosy-purple flower clusters appear on strong, upright stems. Forms a picture-perfect, compact clump of glossy green, thick, grass-like leaves. The bold blooms are a wonderful addition to sunny gardens. An exquisite cut flower, fresh or dried. Full sun. Up to 22" tall and wide. Zones 4-8.
Lisa says: I like alliums like Blue Eddy Allium, which grows closer to the ground, and Windy City Allium, which is another fun allium I added to my collection last year.
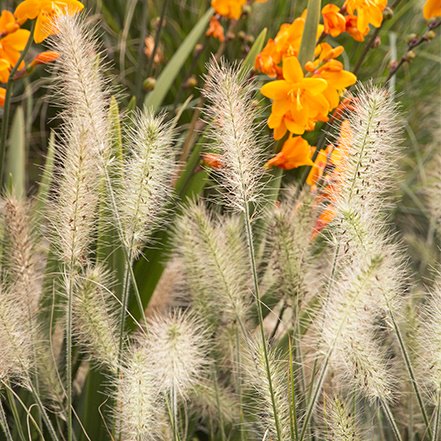
Little Bunny Dwarf
Fountain Grass
The most dwarf of the fountain grasses with fluffy, buff-colored blooms. Terrific contrast for use in rock gardens, borders, foundation plantings, or perennial beds. Foliage turns golden russet in fall. Adds interest and texture to containers. Drought tolerant when established. Full sun. Up to 12" tall and wide. Zones 4-9.
Lisa says: I love the beautiful, fine texture and nice, small form. It can be tucked in a bed or used in mass to create texture.
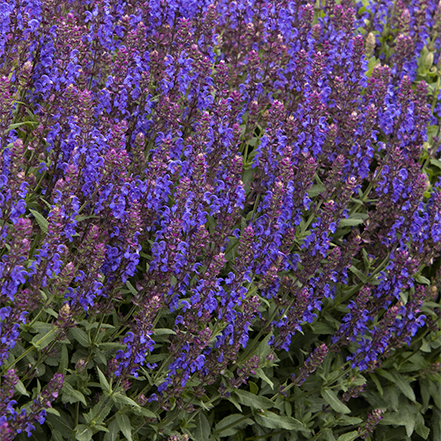
Apex™ Blue
Meadow Sage
This especially compact selection is taller than most, for a bigger impact. A stunning addition to any border with spikes of intense blue-violet flowers that top dense, shrub-like clumps of fragrant, green foliage throughout summer. Excellent for adding bold color in mass plantings. Full sun, 18" tall and wide. Zones 4-9.
Lisa says: I like to mix perennials with fine leaves and those with broader leaves to strike a balanced textural palette. Salvia like this one are perfect for adding wider leaves to a planting.
Lisa's Favorite Perennials for Shade

Sugar and Spice
Tiarella
Shiny, lacquered, deeply-lobed foliage has a lacy appearance. Each bright green leaf has a dark, bold burgundy center marking. Spikes of foamy pale pink and white flowers hover above the foliage. A necessity in woodland and shade gardens. Up to 8" tall, 12" wide; flowers reach 15" tall. Zones 3-8.
Lisa says: I love this plant! it does really well in my shady garden.

Ice Dance
Japanese Sedge
A lush mound of slender, bright green leaves with strong creamy white margins that will brighten woodland gardens, water gardens, and shady borders. Spreads gently by underground stems (rhizomes) to create a dense mat of foliage. An easy-growing, non-invasive groundcover. Up to 1' tall, spreading slowly to form a carpet. Zones 5-9.
Lisa says: Sedges and Tiarella are a great combination!
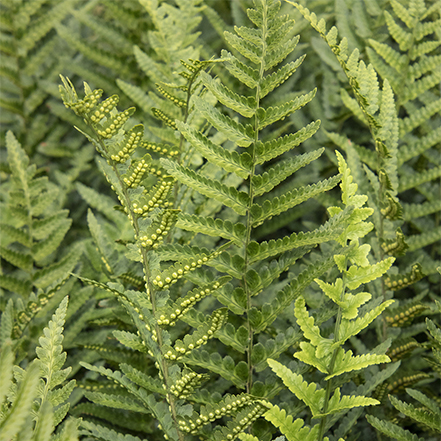
Jurassic™ T-Rex
Wood Fern
Erect fronds ranging from dark to light green form a strikingly vertical clump for a bold and highly textural statement in a shaded garden. Especially handsome when grouped to frame a garden element or niche in architecture. Use to add height and dimension to a low border or brighten a woodland understory. Partial to full shade. Up to 36" tall and wide. Zones 5-8.
Lisa says: Ferns are another fantastic plant for adding texture to the garden.
Meet the Designer, Illustrator and Educator
Award-winning designer, artist, and educator, Lisa Nunamaker is the creator of the website, Paper Garden Workshop. This is a spirited place to learn garden design and landscape graphics. Lisa uses her illustration skills to teach these beautiful topics both online at Paper Garden Workshop and in the Department of Horticulture at Iowa State University. To top it off, Lisa also holds degrees in landscape architecture and is registered in the state of Iowa. Plus, she currently serves on the Association of Professional Landscape Designers National Board of Directors.

You can find Lisa's beautiful illustrations in select Monrovia digital guides. More are coming this spring! Sign up for our Grow Beautifully newsletter to get all upcoming guides delivered straight to your inbox.
Ready to Grow?
Ship Monrovia plants directly to your door. Browse a curated selection available online.
Shop Now >